Laying the Groundwork for Facebook Advertising

“Nobody counts the number of ads you run; they just remember the impression you make.”
– Bill Bernbach
To begin, I’ll go through basic terminologies and concepts in Facebook Advertising to give you a solid foundation.
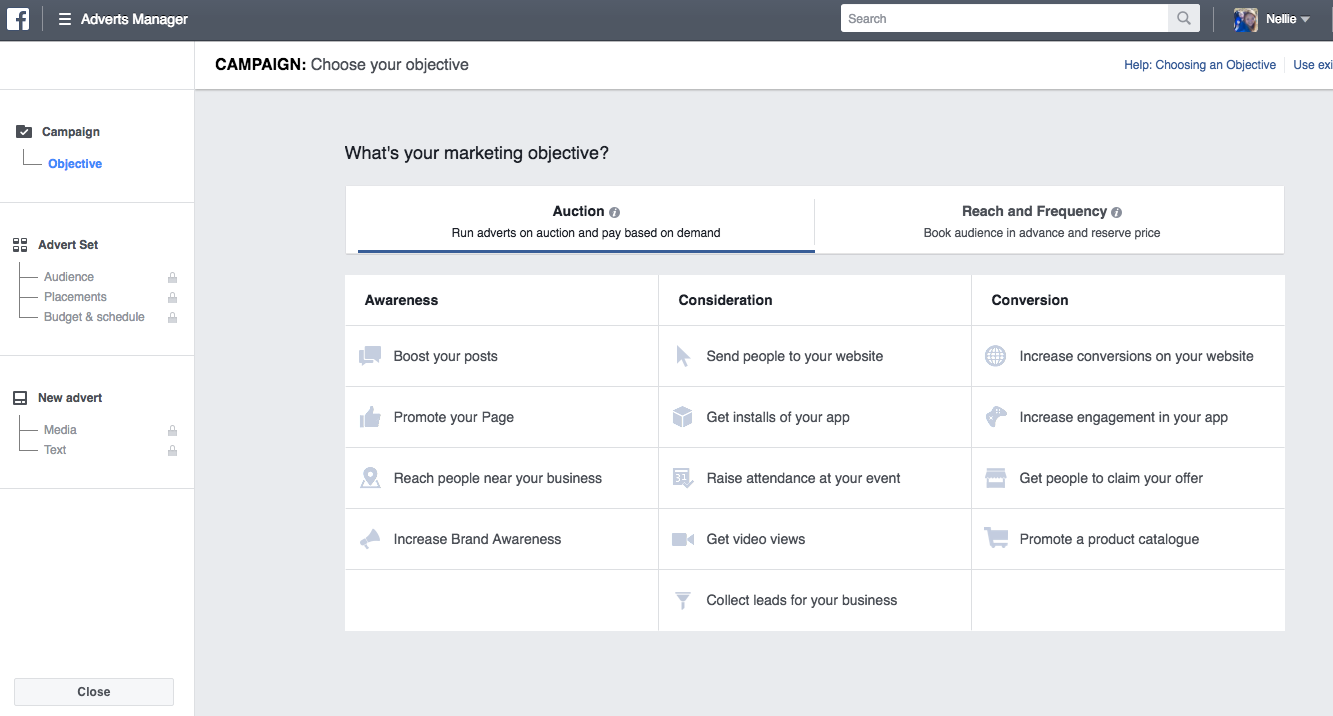
First of all, let’s see what a Facebook ad looks like and how to differentiate between an ad and a regular post.
Every Facebook ad has a “Sponsored” tag right under the name of the Facebook Page that is advertising. All Facebook ads have a call-to-action (CTA) in the bottom right corner to encourage viewers to learn more or sign up. You’ll also find a “Like Page” button — which is never found on regular posts.
It may seem easy to spot a Facebook ad, but it’s not that apparent to the untrained eye. That’s because Facebook always makes sure to integrate ads seamlessly into a user’s News Feed. Unlike YouTube ads, Facebook makes it a priority to blend ads into regular content, so the user’s experience remains uninterrupted.
Components of a Facebook Ad
There are many different types of Facebook ads, as you’ll find out in the next lesson, but regardless of the ad type, you’ll find that every ad has these basic components:
- Headline — The main title of your Facebook ad that grabs people’s attention.
- Text — A short description of the product or site you’re promoting.
- Description — A longer text available in the News Feed describing more about your product.
- Caption — The URL of your domain.
- Author Tag — The name of the writer of the article. This is where your name appears if you’re sharing a blog post written by yourself.
- Call to Action (CTA) — A button showing people what they should do next.
- Image — An enticing picture related to your product.
As you’ll learn later, each ad type has its specs and guidelines for text limit and image dimensions.
Later in this module, I’ll also show you how to create a CTA button, add images, etc. to your ad.
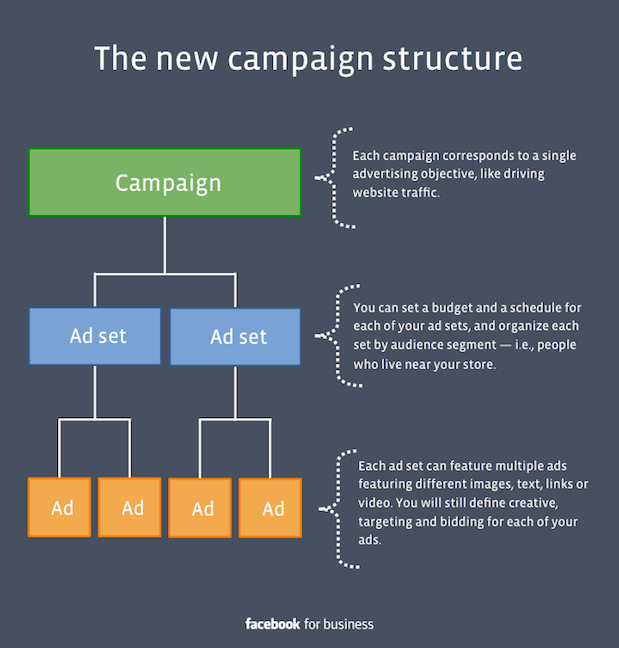
Ads vs. Ad Sets vs. Campaigns
When you first sign up for Facebook advertising, you’ll be immediately prompted to create your first campaign.
A campaign is the broadest level of your advertising elements. It gives you an overall view of all your adverts that have been set up with the same objective. Each campaign corresponds to a single advertising objective, such as generating traffic to a site, increasing Likes, or converting followers to buyers.
For example, if you want to promote your new ebook and get more people to buy it, you can create a new campaign and set your target here.
The next level is ad sets. This is where you choose the type of ads that you want to run and the audience that you want to target. If you're targeting separate audiences with different characteristics, you'll need an individual ad set for each.
Let’s use the same ebook example to illustrate this. You can create one ad set for desktop feed ads and another for right column ads (I’ll explain different ad types in the next lesson). You can have multiple ads in each ad set, and multiple ad sets in each campaign.
What follows next are the ads themselves. This is the level where you fill in your text, headlines, images and CTA buttons, and create the ad itself. You can still define targeting and budgeting for each of your ads here.
In summary, ads live within ad sets which are then all grouped under campaigns. This Facebook illustration gives a clear idea of how it works.
Ad Placements
Ad placements are where you want your ads to appear.
Facebook now offers five types of placements — which include Instagram advertising (which now belongs to Facebook). As this course only covers Facebook, I will skip the Instagram advertising section.
Keep in mind that you can select multiple ad placements for each ad.
There is no best ad placement — you can’t say that one ad placement is better than the other. It all depends on your advertising objective. In other words, certain ad placements might be favorable for particular types of ads. For instance, video ads will do better in the Mobile News Feed rather than in the Desktop Right Column.
Each ad placement generates different click-through rates (CTR) although you’ll find that most of them produce the same cost per click (CPC). This is because the cost per impression is balanced out by the click-through rate.
To leverage all five display locations, you’ll need to set up Adverts Manager using your Facebook Page (refer to the next page for guidelines). If your ad isn't associated with your Facebook Page, you'll only be able to run Desktop Right Column ads.

These are the five types of ad placements you can choose from:
1. Desktop Right Column
This will place ads on the right side of a user’s Facebook News Feed. This traditional style of advertising was the first type of advertising to be introduced on Facebook, and it still exists today.
Right column ads may have lower conversions, but they also cost less per impressions. In general, this placement is less effective at driving engagement but sometimes can outperform the News Feed placements on other types of campaigns such as increasing Likes.
2. Desktop News Feed
Desktop News Feed ads will appear directly in a user's News Feed when he/she accesses Facebook on their laptop or desktop computers. Expect desktop ads to cost around $5-10 per thousand impressions (CPM= cost per mille).
These ads have a higher engagement rate than right-hand column ads, but they can also be more expensive. They also must follow certain criteria for organic Facebook posts.
3. Mobile News Feed
With the majority of people accessing Facebook on their mobile devices (Androids, iPhones, and tablets) these days, it’s wise to focus more on creating mobile News Feed ads.
Mobile ads tend to cost around $10-20 per thousand impressions, double of desktop ads, as these result in the highest click-through rates.
Make sure you have a mobile-responsive site before you run any mobile ads. A mobile-responsive site is one that makes appropriate adjustments when viewed on a mobile device.
However, AgoraPulse experts have found that the conversion rate on mobile is two to three times lower than on desktop. This makes sense as it’s just not as convenient to fill in a sign-up form or purchase information on handheld devices as it is on a desktop.
4. Audience Network
This last placement makes it possible to scale your advertising campaign beyond Facebook. You’ll be able to show your adverts on third-party apps and mobile websites approved by Facebook.
Your adverts reach the right people because it uses the same targeting as your Facebook campaigns, such as location, age, gender, interests and more. When you run your ads on Audience Network, the ads automatically reach your audience when they use an app or mobile site that’s part of the network.
Each app and mobile site in the Audience Network is carefully picked out by Facebook through a manual process, so they’re guaranteed to be safe and high-quality publishers.
The Audience Network uses the same targeting and imagery as your Facebook ads, so there’s no need for new creatives. Ads delivered by the Audience Network come in three varieties — banner, interstitial and a native format designed to fit seamlessly within the apps they appear.

Which Program to Use: Adverts Manager vs. Power Editor
Facebook provides two programs to create and manage your ads: Adverts Manager and Power Editor.
For beginners, I would recommend starting with Adverts Manager as it’s simpler and more user-friendly, although it has limited functionality. When deciding which program to use, think long term and consider the number of ads you plan to run at once.
Ads Manager best suits most bloggers, whereas Power Editor works better for larger companies who plan to launch a variety of campaigns and have more than one person managing them.
Ads Manager is easy to access: just click the arrow in the top-right corner of your Facebook dashboard and select "Manage Ads." Alternatively, you can access it by going to this page: https://www.facebook.com/ads/manager.
At a glance, you can see all your campaigns and ads, as well as the campaign status, results, cost and how many times your ad was viewed.
Power Editor is only suitable for advanced users. It offers more options to customize your advertising. Once you feel comfortable with using Ads Manager and wish to explore further capabilities, it might be time to move to Power Editor.
Power Editor has a bunch of features that you won’t find in Ads Manager, such as:
- Creating advertisements in bulk and importing/exporting results in Excel docs
- Filtering searches by campaign, ad set or any tag you want
- Developing and advertising unpublished posts
- Organizing target audience according to “Saved Target Groups,” “Custom Audiences,” and “Lookalike Audiences.”
- Allows you to create Instagram ads and Facebook Canvas (a new full-screen mobile ad option)
As this course is geared towards travel bloggers, I will use Ads Manager for simplicity’s sake.