

Setting Up Your Facebook Page Like A Pro

"The secret of getting ahead is getting started."
— Mark Twain
An important foundation is essential to any project. Your Facebook page will be the foundation on which you build your marketing efforts. So, it's important to get it right. Before you start reaching out to your readers, let's dive into the details of how to set up your Facebook page like a professional.
Facebook Page vs. Profile
According to Facebook marketing expert Mari Smith, people who like your Facebook Page spend an average of two times more on your products than people who aren’t connected to you on Facebook.
If you haven’t already created a Facebook Page for your brand, it’s time to start one now.
Most of us already have a Facebook personal profile. With your existing account, you can create a Page in just seconds.
The main difference between a Facebook Page and personal profile is that a Facebook Page represents a brand or business; while a personal profile is for non-commercial use and represents an individual.
Facebook Pages look similar to personal profiles, but they have unique features for businesses, brands, and organizations. Pages are managed by people who have personal profiles, and they can be run by more than one account.
A Step-by-Step Guide
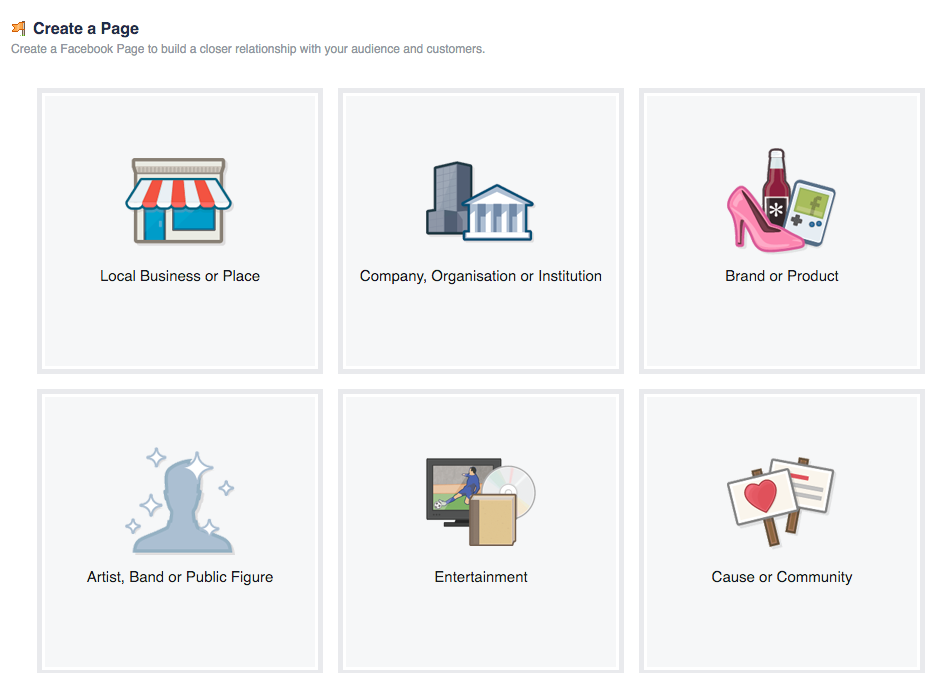
To set up a Facebook Page, go to facebook.com/pages/create.
Follow the steps below:
- Select the “Brand or Product” option if you are a travel blogger or brand
- Choose “Website” for the sub-category from the drop-down list
- Type in your preferred Page name
Your Page name is what people will type into Facebook’s search to find your Page if they don’t know your URL. Choose your title wisely when you get started because after your page has 200 fans, you will have to submit a request to change your Page name.
I strongly advise you to use the name of your blog on all your social media channels to ensure coherence in your branding. For instance, if your blog name is “BackpackerJane,” your Facebook URL should naturally be http://www.facebook.com/BackpackerJane
Once you click "Get Started," you’ll be directed to the setup page. First, fill in your “About” page by adding a detailed description of your Page. You only have 155 words, so make the most of them and tell your audience what your brand is about and what you can offer them. Remember to add a link to your blog at the bottom of the “About” page as well.
In your setup page, you’ll also be asked to select "Your Preferred Audience," think about the potential audience you want to have in your community:
- Where are they from?
- How old are they?
- What are their interests?
By filling up this tab, Facebook can better connect you with your target audience.
Converting Your Personal Profile to Page
If you prefer just to have one Facebook profile to manage, you can simply convert your personal profile to a Page.
It is incredibly easy and only involves one click. Login to your personal profile and go to this page: https://www.facebook.com/pages/create/migrate/
Click on “Get Started,” and Facebook will automatically transfer your current profile picture and cover photo to your new Page.
The name on your personal account will become your Page's name, but you can go into your new Page’s settings and change the name if you like.
You'll also have the option to add friends as people who like your Page and to transfer photos you've shared from your personal account to your new Page. Keep in mind that any photos you move to your new Page will be public by default.
Note that it's against the Facebook regulations to use your personal account to represent your brand or business. You could permanently lose access to your account if you don't convert it to a Page.
Choosing the Perfect Profile Photo and Cover Image
The next step is to upload your profile photo and cover image onto your new Page.
When choosing these two images, consider your niche and what you are all about. What is your favorite travel experience or the best memory you have from the road? Which photo most represents you? Do you have any that were taken at the happiest moment in your travels?
Some established bloggers have enlisted the help of professional photographers to capture them at their best. You can choose to have your photo taken in a studio or outdoors — depending on your preference and, again, on your brand.
For your profile image, use a photo of at least 180x180 pixels. It will be automatically cropped to fit a square; try to avoid a close-up or a distant shot. The image displays at 160x160 pixels on computers, 140x140 pixels on smartphones and 50x50 pixels on most feature phones.
Examples of Profile Photos and Cover Images

This is an example from my own Facebook Page. I use a headshot that was taken in as studio as my profile photo, and a collage of several images as the cover image. From these images, my audience will immediately get a sense of what I’m about: I clearly love the outdoors and I’ve got an adventurous spirit.
The cover image is a large, horizontal photo that occupies the top part of your Facebook page. It’s a space that allows you to further define your brand, so be sure to make full use of it.
With the cover image, you have more room to play with than with your profile image. Many bloggers use this space to add their logo or blog’s tag line while others include travel quotes or their current travel destination.
As for dimensions, use a photo that is at least 399 pixels wide and 150 pixels tall for the cover image. JPG files less than 100 kilobytes load the fastest, but PNG files work best if you have included a logo or text on your image. As a reference, the cover photo displays at 828 pixels wide by 315 pixels tall on computers and 640 pixels wide by 360 pixels tall on smartphones, but doesn’t display on feature phones.

Goats on the Road definitely took full advantage of the extra space on the cover image to add in their branding. Besides their blog name and logo, they’ve also included a CTA (Call to Action) on the cover photo, that will encourage new users to like their Facebook Page.

Here’s an example of a cover image from the Facebook Page of Getting Stamped. They’ve actually used a drone video that they especially created for the Facebook header, which is a great way to get massive engagement from audience and convey a better message of what they're about.