

Scheduling and Tracking

"Make sure your content or product is helping people become happier, or don’t even bother."
– Ramsay, aka The Blog Tyrant
With a content strategy and posting plan in place, it’s time to put them into action and start publishing quality content for your audience.
I know it looks as if most bloggers spend 12 hours a day on Facebook to post, comment, and interact with others, but in reality, they probably just spend about 30 minutes each day.
It’s all thanks to Facebook’s automation features, which allow us to set everything on auto-pilot and spend more time creating quality content and coming up with new strategies.
Scheduling on Facebook
Facebook allows you to schedule your posts between 10 minutes and six months of creating them (the dates more than six months away are grayed out), but the feature is currently available only on Facebook Pages. However, it’s said that Facebook will be introducing this feature to personal profiles soon — so stay tuned to keep updated.
The best thing about this scheduling feature is that scheduled posts aren’t identified or penalized for being scheduled. When you post from a different scheduling tool such as HootSuite or BufferApp, people can see that you’re posting through a different tool.
It’s also said that Facebook collapses posts that have been scheduled using third-party tools or shows them less than normal posts in the News Feed. In comparison, Facebook’s scheduling feature is seamless and scheduled posts appear as normal posts.
On the other hand, if you have linked your Twitter account to your Facebook page so that everything you post on Facebook gets tweeted, be aware that your scheduled posts won’t be automatically tweeted. You will have to either scheduled your tweets with a different tool or manually tweet out your Facebook posts when they go live.
Why Schedule Your Posts?
Scheduling posts not only saves you time but also brings more engagement.
First of all, we can’t be glued to Facebook 24/7. While traveling in different parts of the world, the lack of internet access or being in a different timezone means we may be online when most of our followers are the most active on Facebook. Posting at the right time allows us to maximize our post reach, and that’s where scheduling comes in handy.
It’s not a very good idea to dump several shares on your followers at once. It’s more effective to space them out throughout the day. This keeps your page in the news feeds and hopefully supplies them with relevant content that may interest them. Scheduling allows us to post more regularly and increase our posting without spending all day on Facebook.
I encourage you to try some experiments with scheduled posts on your page and see how things work for you.
Let’s dig a little deeper and find out more about Facebook scheduling features.
How to Schedule Your Posts
Scheduling is easy — just follow these steps:
- Write your update as you’ll normally do. Feel free to attach photos, links, videos, add tags to other pages and events, check in, and add how you feel.
- In the lower-right corner of your post, click on the arrow button next to ‘Publish’ and choose ‘Schedule’ from the drop down menu.
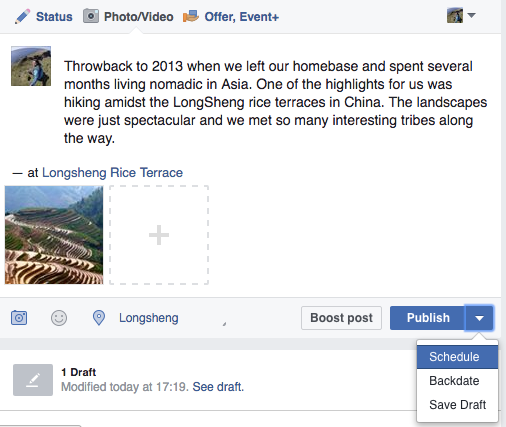
- A box will pop up. You can now select the date and time you want the post to be published. The time is shown in your computer’s local time zone. Notice that you can also backdate your posts to supplement your Timeline if you wish (more on that later).
- Below that is a ‘stop news feed distribution’ opt-in button. Clicking on it allows you to select a date and time in the future for when you want your post to cease to be shown in News Feed. The post will still be visible, but News Feed distribution will end.

Once you have everything set, click the blue Schedule button. You’ll then see a prompt below the update box, telling you that you’ve got 1 Scheduled Post. Click on the ‘See post’ post to get a preview of the post and make sure it looks alright. You’re all set!
How to Find and Edit Your Scheduled Posts
To see what you have scheduled and make any changes, go to your Facebook Page dashboard and access the ‘Publishing Tools’ tab.
Once in Publishing Tools, select ‘Scheduled Posts’ from the right-hand column to see all of your scheduled posts.
If you need to edit any of your scheduled posts, click on the particular post to open it up. You’ll then see the desktop and mobile previews of your post.
To edit the text, click on the ‘Edit’ button in the lower-left corner.
To cancel or change the time, click on the arrow button next to "Edit." Here, you can choose to reschedule or backdate the post. Just modify the date and time on the calendar and click "Publish."
In the drop-down menu, you can also choose to publish, delete, or remove the schedule of the post. If you remove the schedule, the post will be moved to Drafts.
Here you can also boost your scheduled post (more details in the next module) to amplify its reach.
What Can You Schedule?
You can schedule links, photos, status updates, and videos. Facebook now also allows you to add photo albums, tag other Pages, check in, and add how you’re feeling in your scheduled posts. Even offers and events can be scheduled in advance.
The only things you can’t schedule are shares — i.e. when you click ‘share’ on someone else’s link or video, the post gets shared immediately with no option to schedule. However, you can copy the link and paste it into a new post and then schedule it from there. Videos, however, can only be shared instantaneously.
Why Backdate Your Posts?
As mentioned, you can schedule things in the past. Some people backdate their posts to fill out their Timeline. If you have a significant event that you want to post about in the past, I recommend a milestone post instead.
Milestones are a special type of post that let you highlight key moments on your Page's Timeline. To add a milestone to your Page, just click ‘Event’ in your update post box and select "Milestone."
The good thing about backdating is that the post does go out into people’s News Feed immediately, and is also shown at the appropriate place on your Timeline.
How to Set Expiry Date on Posts
It comes as a surprise to many that Facebook allows users to set new posts for deletion after a certain interval of time — anything from one hour to seven days. (Like Snapchat!)
Expired posts will disappear from your profile, but may remain on Facebook servers for up to 90 days before they're completely purged. The appeal of self-destructing messages is easy to understand: sometimes you want to post a photo but you don't want it to stick around for 20 years.
However, I don’t think this is relevant for travel bloggers: how often is there something you want to share with all of the people you know, but that you'd also want to go away in a week? I have only used this feature once.
First, you’ll need to allow expiring posts on your Page:
- Click "Settings" at the top of your Page.
- Click "Expiring Posts."
- Click to check the box next to "Allow people who manage this Page to select a time when posts unpublish."
- Click "Save Changes."
To expire photo or updates posts, you just need to tick the ‘stop news feed distribution’ post when you schedule the post. This means that the post will stop showing in News Feed, but it’ll still be visible on your Page's Timeline.
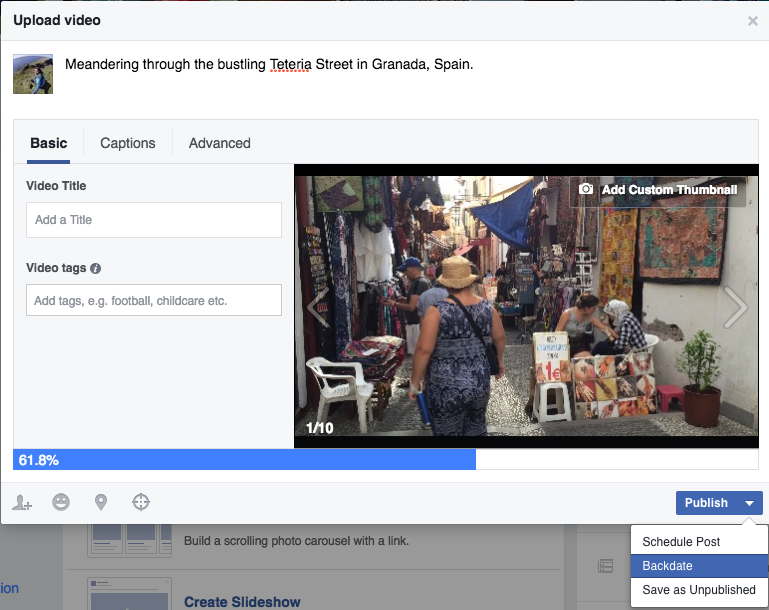
For videos, you need to click "Schedule Expiration Date" when scheduling the video post. If you want to delete the post when it expires, click to check the box next to "Delete the post." This will permanently remove the post completely at the scheduled time.
If the video has already been published to your Page and you want to expire it, hover over the post on your Page’s Timeline, click on the top-right corner, and select "Schedule Expiration."
When your video expires, it won't be visible on your Page or anywhere else it was shared on Facebook.
To see a video after it expires, click "Publishing Tools" at the top of your Page, then click "Expired Posts."
How to Edit and Publish Drafts
In the occasion that you’re unable to finish writing a post, you can always save your post as drafts and then go back and edit or publish them.
To edit or publish drafts for your Page:
- Click "Publishing Tools" at the top of your Page.
- Click "Drafts" in the left column.
- Select the draft you want to edit or publish.
- From here, click "Edit" to edit the draft. To publish the draft, click "Publish."
Facebook allows you to edit the post update, check in, and add how you’re feeling (using the emoticon), but it doesn’t let you edit the photo/link.